- Before anything: find your provider’s console
- 1. Update everything
- 2. Create a non-root user
- 3. Copy your SSH key to that user
- 4. Open a second terminal and log in. Do not skip this.
- 5. Now disable password authentication
- 6. Firewall
- 7. Fail2ban
- 8. Automatic security updates
- 9. Add swap
- 10. Set the timezone and hostname
- Then verify from outside
- If you haven’t bought one yet
- How we checked this
- FAQ
Your First 10 Minutes on a New VPS (Do These in Order)




Table of Contents
- Before anything: find your provider’s console
- 1. Update everything
- 2. Create a non-root user
- 3. Copy your SSH key to that user
- 4. Open a second terminal and log in. Do not skip this.
- 5. Now disable password authentication
- 6. Firewall
- 7. Fail2ban
- 8. Automatic security updates
- 9. Add swap
- 10. Set the timezone and hostname
- Then verify from outside
- If you haven’t bought one yet
- How we checked this
- FAQ
You have root, an IP address, and a blank Ubuntu box. Everything below takes about ten minutes.
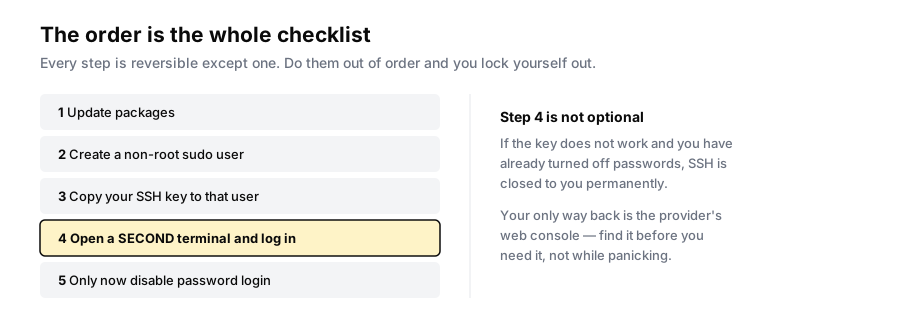
The commands aren’t the hard part — most checklists list the same ones. The ordering is. Disable password authentication before confirming your key works and you have locked yourself out of a machine you bought four minutes ago, with no way back except your provider’s web console.
So: in this order.
Before anything: find your provider’s console
Do this while nothing is wrong. Every provider on this page gives you browser-based console access to the machine — it bypasses SSH entirely, because it’s the equivalent of a monitor and keyboard plugged into the server.
Find that button in your control panel now, while you have no reason to. It is the single thing that turns “I locked myself out” from a rebuild into a two-minute fix, and hunting for it while panicking is a worse experience than it needs to be.
1. Update everything
sudo apt update && sudo apt upgrade -y
Provider images are built at some point in the past and shipped repeatedly. Assume there are pending security patches, because there usually are.
2. Create a non-root user
Working as root means every typo runs with full privileges, and it means the account attackers already know the name of is the one that matters.
adduser axel
usermod -aG sudo axel
3. Copy your SSH key to that user
From your own machine, not the server:
ssh-copy-id axel@YOUR.SERVER.IP
No key yet? Make one first — ssh-keygen -t ed25519 — and keep the passphrase.
4. Open a second terminal and log in. Do not skip this.
This is the step that matters.
Leave your current session connected. In a new terminal window:
ssh axel@YOUR.SERVER.IP
You want to land at a prompt without being asked for a password. Then check sudo works:
sudo whoami # should print: root
If either fails, fix it now while you still have a working root session in the other window. If you’d already disabled password authentication at this point, you would have nothing — no key access, no password access, and only the console to fall back on.
5. Now disable password authentication
With the second session confirmed working:
sudo nano /etc/ssh/sshd_config
Set:
PermitRootLogin no
PasswordAuthentication no
Then:
sudo systemctl restart ssh
Keep both sessions open until you’ve opened a third and confirmed it still works. Restarting ssh doesn’t drop existing connections, which is exactly what gives you a safety net — use it.
6. Firewall
sudo ufw default deny incoming
sudo ufw default allow outgoing
sudo ufw allow OpenSSH
sudo ufw enable
Add ports as you actually need them — sudo ufw allow 80,443/tcp for a web server — rather than pre-emptively.
One critical caveat if you’re going to run Docker: ufw will not filter ports published by Docker containers. Docker’s own documentation says container traffic “is routed before the firewall rules can be applied, effectively ignoring your firewall configuration.” That’s not a hypothetical — it’s how self-hosted admin panels end up on the public internet behind a firewall that reports everything denied. The full explanation and fix is worth reading before you install Docker, not after.
7. Fail2ban
sudo apt install fail2ban -y
sudo systemctl enable --now fail2ban
With password authentication already off this is a smaller win than it used to be — there’s no password to brute-force — but it trims the log noise from the constant background scanning every public IP receives.
8. Automatic security updates
sudo apt install unattended-upgrades -y
sudo dpkg-reconfigure --priority=low unattended-upgrades
This is the highest-value item on the page for a server you’ll stop thinking about, which is nearly all of them. A box that patches itself is worth more than any amount of one-off hardening.
9. Add swap
Most provider images ship with no swap at all, and the consequence is specific: without it, a memory spike doesn’t slow the machine down, it kills a process outright. On a small VPS that’s the difference between a sluggish minute and a dead application with nothing in its log.
sudo fallocate -l 2G /swapfile
sudo chmod 600 /swapfile
sudo mkswap /swapfile
sudo swapon /swapfile
echo '/swapfile none swap sw 0 0' | sudo tee -a /etc/fstab
Confirm with free -h. If something later dies mid-task with an empty log, that’s an OOM kill — and swap is the cheapest insurance against it.
10. Set the timezone and hostname
Small, but they make every log you read afterwards easier to interpret:
sudo timedatectl set-timezone Europe/London
sudo hostnamectl set-hostname my-server
Then verify from outside
Everything above was checked from the server. Check it from somewhere else:
nmap -Pn -p 22,80,443 YOUR.SERVER.IP
Only what you deliberately opened should answer. This is a habit worth forming now, because the whole class of firewall surprises — Docker especially — only shows up in a test run from another machine.
If this server is going to run an AI agent, our exposure audit covers the agent-specific checks, and Tailscale closes every public port including SSH.
If you haven’t bought one yet
Briefly, since you’re presumably here having already clicked buy:
Hostinger — the gentlest start, with a browser terminal in hPanel that doubles as your recovery console and generous RAM per tier. Hetzner — the cheapest per gigabyte when its CX tier is in stock (check first — it has been showing as unavailable, and the CPX fallback is several times dearer). Plain and fast, and the right answer if you’re comfortable at a terminal. DigitalOcean is a common first VPS with excellent documentation, though its tracked link isn’t working on our end so we’ve left it unlinked. UltaHost and Cloudzy sit at the budget end — Cloudzy bills monthly with no term, which suits a machine you’re experimenting with. IONOS offers unlimited traffic and European datacentres; price it on the standing rate of $11/month rather than the $4 introductory figure, which lasts three months of a twelve-month term.
Our cheapest VPS hosting index compares RAM per pound, and VPS hosting under $5 judges the bottom end on renewal price rather than the banner.
How we checked this
The Docker and ufw interaction is quoted from Docker’s own documentation. The remaining commands are standard Debian/Ubuntu administration, and the ordering is the substance of this article rather than the individual steps.
What we did not do: we didn’t provision a fresh server from each provider to verify their console paths, so we’ve told you to locate yours rather than describing menus that may have moved. IONOS pricing is from its own VPS page read in August 2026, where the entry plan is $4/month for three months on a twelve-month term and $11 thereafter — its former flat-rate $2 VPS XS no longer appears.
The hosting links above are affiliate links. Every command on this page is free, and the most valuable instruction — open a second terminal before you change SSH — costs nothing at all.
FAQ
What should I do first on a new VPS?
Update packages, create a non-root sudo user, add your SSH key, and verify that key works in a second terminal before disabling password authentication. That verification step is what separates a routine setup from a lockout.
How do I avoid locking myself out of my VPS?
Never change SSH configuration from your only session. Keep the original connection open, confirm the new access method in a separate window, and know where your provider’s web console is before you need it.
Do I still need Fail2ban if I use SSH keys?
It’s optional once password authentication is off, since there’s no password to guess. It still reduces log noise from automated scanning, and costs nothing to install.
Will UFW protect my Docker containers?
No. Docker publishes ports in a way that bypasses ufw entirely — its documentation says packets are routed “before the firewall rules can be applied.” Bind published ports to 127.0.0.1, or filter in the DOCKER-USER chain.
Does my VPS need swap?
Most images ship without it, and adding 2GB is worth doing. Swap turns a memory spike into slowness rather than a killed process — and a process killed for memory leaves no error in its own log, which makes it disproportionately hard to diagnose later.
Should I disable root login?
Yes, along with password authentication — set PermitRootLogin no and PasswordAuthentication no once your sudo user works with a key. Root is the one account name every attacker already knows.
How do I know the firewall is actually working?
Scan from a different machine with nmap -Pn -p 22,80,443 YOUR.SERVER.IP. Checks run on the server itself can look correct while a port is open, which is precisely the Docker failure above.